Tuesday, July 27, 2010

My Vision

Image stolen from geekologie.com

I thought I'd take a break from my usual posts just to tell you a bit about why I choose to post the things I do.

Obviously, the main aim of the blog is to put up photos of my army, and that's generally what I concentrate on. However, before I started on this blog, I always enjoyed reading about someone else's army and being able to find out how they've produced the models I'm looking at.

To this end, as well as pictures of my models, I also want to post about the ways in which I've gone about painting and modelling. I'm well aware that much of this will already have been discussed elsewhere (indeed, I've discovered many of these techniques from reading blogs and forums, and I do my best to acknowledge where I have learnt techniques from), and quite often by someone much more skilled than myself, but I want people to be able to browse through my army and, if they want to, immediately find out more information about the techniques I've used.

Aside from that, it also serves as a record for me, so if I haven't painted for a while I can easily look up the techniques or the paint scheme used!

Anyway, the upshot is that I'm hoping that even though you can often read about this stuff elsewhere, this blog provides a 'one stop shop' for the hobby - as far as the production of my army is concerned - and that people can learn something new from my articles. To that end, if there is a technique, conversion, or anything else that you would like to find out more about, please ask me and I'll do my best to give you an answer!

And just so this post isn't completely devoid of any army pictures, here's what's on my table at the moment:


Back to the usual stuff next time!

Monday, July 19, 2010

Reinforcements Arrive!


It's been a busy few weeks, and I didn't have much time for the hobby until the week just gone, but I finally have some more Guardsmen painted! You might notice I've changed the base rims to be Calthan Brown (I had originally painted Squad 812 with Scorched Brown rims) for a bit of contrast - my army will all be like that.

I also decided to borrow Admiral Drax's idea for unit identification markings on the rear of the bases. All the troops have squad markings on their shoulderpads, but with the weathering I do that's not always easy to see. Hopefully the markings on the base make organising my troops a bit easier!

These changes have also been made to Squad 812 - apart from that, they're painted in pretty much the same way. I tried painting a darker complexion on a couple of troops, using a paint scheme I found here. I modified it slightly, so it ended up being:

1. Chaos Black basecoat.
2. Scorched Brown/Chaos Black 50:50 for the next layer.
3. Scorched Brown next.
4. Scorched Brown/Graveyard Earth in a 50:50 mix.
5. Graveyard Earth.

I didn't highlight any more as it started to get too light. Let me know what you think!

I'm on a bit of a roll now, so hopefully I'll start cranking through some more stuff soon!

Friday, July 16, 2010

Air Time

Whoops! I knew it had been a little while since my last post, but I checked last night and it was over 2 weeks ago! This is just a quick update to let you know I'm still working away - I'll hopefully have more to show after the weekend!

I was excited to see this rock up in the post last week:


My brand new hobby compressor! It's a nice little unit, and is really quiet, which is a plus. I'll be putting it to good use once I get to painting my tanks. Hopefully I can replicate the techniques from the Imperial Armour Masterclass and create some nice-looking tanks! Stay tuned...

I've also been painting up the start of my next squad. I'm waiting to do all the sergeants together, then all the heavy weapons together etc., so that's why I still haven't finished off Squad 812. I'll be getting around to them soon though! So here's what's on my painting desk at the moment:


Most of the work has been done so far, which means they shouldn't be too far away! As I mentioned, I hope to have them done by the end of the weekend, so I should be posting another update then.

I'm in a bit of a groove with painting these guys at the moment, so I'm hoping I can keep that going and chew through a lot of painting pretty soon. That's the plan, at least! I must admit, it is a good feeling getting things finished after all this time.

Thanks for looking!

Wednesday, June 30, 2010

Grenade Launcher Guardsman

Just a quick update - I've been pretty busy lately and haven't had a lot of time for updating my blog, but rest assured I'm still cruising along with my army!

I have a 1,200 pt tournament coming up, and was 1 Grenade Launcher short of having the infantry component built. (Pictures of the rest will be up in the next few weeks!). There's only so much one can do with the single set of GL arms that come with the Cadian Troops box, and I didn't want all 3 of my GL-wielding troops looking the same. Here's what I came up with:


To make him, I grabbed the Cadian Command Squad box, with a GL from the Catachan Command Squad box (which doesn't have a hand attached to the trigger). I added the handle from a section of plasticard rod which had rings carved out of it, which hopefully looks close enough to the 'real' handles.

Finally, I noticed that the helmet-holding arm was much skinnier than the standard Cadian arms, and it had a cuff on it which the standard troops don't possess. To fix it, I used some Green Stuff to bulk out the inside of the arm, and carved the end of the sleeve down to match the standard arms.

Paint will be applied soon! As always, thanks for looking and feel free to leave comments!

Wednesday, June 9, 2010

Lt. Lokk's Lads

Well, they may not end up being called that, but a little bit of alliteration never goes astray, and I didn't think Brigadier Bob's Buddies sounded quite right...

Anyway, I've been working away on my first veteran squad. They're led by a Sgt. Bastonne counts-as, with carapace armour and 3 meltaguns. It's a hefty lot of points, but they'll get a Chimera eventually so hopefully I can deliver them to a target, destroy it with meltas, and still survive a round of shooting with their 4+ save. I took Bastonne mainly for his ability to give orders and regroup regardless of restrictions, as this squad might end up moving out of orders range from my command squads in order to engage targets.

For the most part, the models were made using pieces from the Cadian, Catachan, Space Marine Scouts and Tau Fire Warrior sprues with a few other bits and pieces thrown in. I was aiming for a mix of parts to personalise each trooper, but with enough similarities to tie the squad together.

So here's the main event. What you've all been waiting for... *cue drum roll*...

Pictures!

Firstly, here's the squad as a whole:


The armour was done by taking Tau Fire Warrior legs, cutting of the feet and replacing with Cadian boots, and then filling in the gaps with Green Stuff. Some poses require more work than others, but I think it came out OK. The heads are from Pig Iron Productions.


Now a few pictures of the individual models and some notes on the conversions:


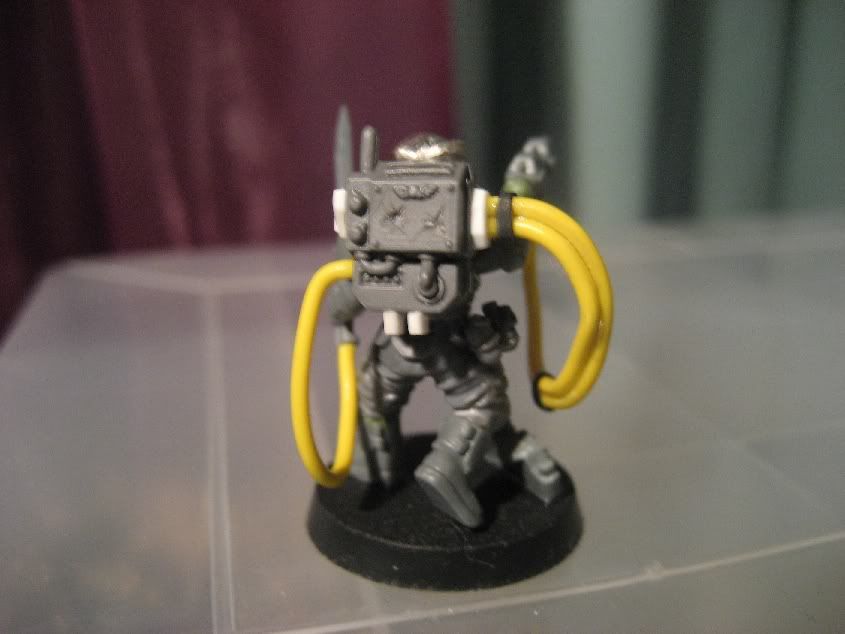
First up we have the Bastonne counts-as. He has a hellpistol, so I cut down a lasgun and tried to copy the hellpistols from the Kasrkin models. I'm actually pretty proud of the job I did (if I may say so myself) and I don't think you'd be able to tell the difference once it's painted. The backpack was a cut down vox-caster, the power sword converted from the Cadian Command Squad and the chainsword arm from the Troops box, and the hoses for the pistol simply electrical wire. The black bands were heat-shrink pipe cut down to size. You can find this stuff at electronics stores, and you put it over what you want, then heat it with a hair dryer (there is a proper tool for it, but anything that blows hot air will work) and it shrinks down.

Now I know you all think I'm amazing and get everything perfect the first time around (or at least, I like to tell myself that you think so) but here's the previous iteration of the sergeant:


You'll see the hoses were originally connected to the side of the backpack which made them look way too long and out of place. I think the new version looks a lot more streamlined.


This was the first veteran I did. He has a Forgeworld Resin Backpack, Space Wolves knife and some Space Marine Scout belt accessories. Some minor green-stuffing and I came up with the above.


This guy is one of my favourites. He has a Space Marine scanner for something different, and the armour plate he is resting on was just some platicard, melted with a lighter to look battle-damaged (kids and accident-prone people, make sure there's an adult around!) and some rivets added from chopped up styrene rod. The meltagun nozzle is some styrene pipe, because when I was drilling out the barrel the bit snapped off and I had to destroy the original gun to get it out. Lesson learned...


This guy was just for a bit of fun. He's the token 'crazy guy in the squad of battle-hardened troops'. You know the one...

Anyway, I hope you like them - I certainly enjoyed converting them up! As always, thanks for looking and watch this space!

Wednesday, June 2, 2010

Identity Crisis Marbo!

Here's something I've been working on for a little while - my counts-as Marbo. I wanted to get across the idea of a cold-blooded, emotionless killer as described in the background, but a slightly more twisted take on it.

The fully-enclosed face was chosen to remove personality from the model, and his poisoned weapon is a pair of wrist-mounted syringes - his victims suffer a swift, clinical death, in line with the way I imagine the character.

I used green stuff to make his wrist weapon, as well as modifying his backpack and gun. Plasticard was used for various parts.


I'd be interested to hear your opinions, especially about the scope on his gun. I'm not sure if I should add anything more, or leave it as is. Let me know what you think in the comments!

He's made from a lot of different parts, apart from the plasticard and Green Stuff. The bits used are:
  - Cadian heavy weapons helmet with visor.
  - Respirator from Cadian Command Squad sprue, with hose cut off.
  - Cut down lasgun.
  - Catachan Vox-caster backpack (cut down).
  - Catachan legs.
  - Cadian Torso.
  - Cadian arms (I can't remember which ones, in particular).
  - His left fist is a cut-down one from the grenade launcher hand (the one holding the handle).
  - His melta bomb is, as I found out afterwards, represented by a Tau Photon grenade (I've added a few bits to it, so hopefully it won't be so recognizable).
  - The ripper pistol barrel is from a vox-caster's antenna.
  - The round bit on the back of the ripper pistol is cut from a bipod from the heavy weapons sprue.
  - The demolition charge is from Forgeworld.
  - A couple of frag grenades from the Cadian troops.

Let me know what you think! I'll post an update as soon as I've painted him, but it could take a while - he doesn't currently feature in my 1,500 point list, so isn't a high priority!

Wednesday, May 26, 2010

Painting a Guardsman, the Frag_Dad Way - Part II

Welcome back! (I'm hoping at least SOMEONE is reading this...) Today I'll walk you through the steps to finish off the Guardsman we started here. If it's been a while, I'd suggest you go back and read the General Tips I gave in Part I. At the very least, remember to keep thinning your paints!

The following steps should achieve:


We've basically finished the armour, flesh and fatigues, so let's do the final touches to finish our Guardsman! I think these bits are just as important as the rest of the model - no matter how well you've painted his armour, flesh etc., if you've neglected the details it really shows. When I first started painting I'd do most of the model but not be all that happy with it, but once I started finishing off the details it really pulled the paint job together and looked much better! So let's pick up where we left off:


24. We'll start with the chin strap - paint the lower parts it with Bleached Bone. (No picture).

25. Wash this with Devlan Mud.


26. On to the belt accessories. Paint the grenades and canteen with Gnarloc Green.


27. Wash the grenades with Badab Black, and the canteen with a heavy wash of Devlan Mud.


28. Once dry, highlight the raised areas of the grenades with Gnarloc Green, and do a 'rough' highlight of Gnarloc Green around the canteen. I say rough because I don't want it to look to clean and pristine - it gets used a lot!


29. Paint the handle of the knife with Graveyard Earth.

30. Wash the knife handle with with Devlan Mud.

31. Highlight handle with Graveyard Earth.

32. Highlight handle again with Snakebite Leather.


33. To make the leather of the belt accessories look worn, drybrush some Codex Grey over the surfaces which would see a lot of wear-and-tear, such as around the edges, the studs on the pouch and canteen, and the tip of the bayonet holder (is it still called a scabbard if it holds a bayonet?).


34. Going back to the chips on the armour, underline some of the more prominent ones with a thin line of Dheneb Stone. I tried white, but it didn't look quite right.

35. Overline them with a Scorched Brown. This simulates a 3D effect on the chips.


36. Paint the base with Scorched Brown. Make sure this covers the black properly, (especially around the rim) so this may take more than 1 layer.


37. Now we've done most things except for the weathering pigments and metallic colour. We need to do the spray varnish now (otherwise it will kill the metallics) so grab your model and give it a spray. Make sure you wait for it to dry before you continue! It's wise to test the spray first on an unimportant model (or a bit of sprue) to check that you're not going to destroy your hard work!


38. If you want 'wet' looking mud, paint some satin varnish on the base.


39. Now we need to tie the Guardsman into the base. He's trudging through thick mud, and it looks a bit odd without some consequence of that represented on the model. I use Vallejo's Burnt Umber pigment, mixed with brush-on Vallejo Matte Varnish (to get it to stick to the model) and brush that on around the boots. I try not to go too thick, so you can still see the colours underneath showing through, but just do what looks good to you. The matte varnish works very well - once the pigment mixture has dried, even scrubbing at it with a toothbrush won't take it off easily.

40. Drybrush the mud with Calthan Brown and then Graveyard Earth to give some depth and variation.

41. If the areas where the metallics will be painted have stray coloured paint on them, it's a good idea to paint them black now. There's not enough pigment in the metallics to completely cover the area easily, and you may find underlying colours tend to show through.

42. Paint all the metal areas (knife blade, if applicable, aquila, lasgun nozzle, grenade pins etc.) with Gunmetal.

43. Wash these areas with Badab Black.


44. Highlight with Gunmetal.

45. For some select spots, highlight with Chainmail. This is rather bright, however, so don't overdo it. (The Chainmail highlights here are much too stark - I since went back and dulled them down with thin layers of Gunmetal).


46. To protect the metallic paint, it is a good idea to paint some satin varnish on the bits that will get handled lots (such as the bayonet blade) to stop it wearing off.

And we're done! Hopefully you'll have something looking like this:


So in only 46 easy steps, we have our Guardsman! Now I realise that's a lot, but most of these took less than a minute to do. In addition, you can omit some of the layering (such as on the flesh) if you want to cut down on the amount of painting. I think all the work is worth it though, especially when you see a group of them together.

Even if you've only skimmed this guide and haven't painted up a model yourself, I hope you might have picked up an idea or two. In any case, thanks for reading, and happy painting!